Website admins cover a wide range of skill levels. For the absolute beginner, cPanel can get a bit overwhelming with all its complicated functions that they will likely never use. On the other end of the spectrum, there are those for whom cPanel is insufficient. While it tries to encapsulate the most commonly used functions across a variety of users, there are some things that it simply cannot handle. For these situations, we have SSH. This tutorial will show you how to use SSH from cPanel with step-by-step screenshots.
Not all hosting providers allow SSH access for all plans, and some make you ask for it via customer support. A few allow you to fill out a form for automatic access. For example, you must switch on HostGator SSH by enabling shell access. This tutorial assumes you already have permission to use SSH.
Table of Contents
Here’s a more detailed explanation with screenshots.
Step 1+ 2+3: Generate a Private Key, Save it, and Get the Credentials
The first three steps are the same as those to enable SFTP on cPanel.
From now on, I will assume that you:
- Have saved the private key on your local computer
- Have the password for the private key that you generated in Step 1
- Know the hostname and port number, which is the same for SSH and SFTP
Step 4: Convert the Private Key to a *.ppk Format
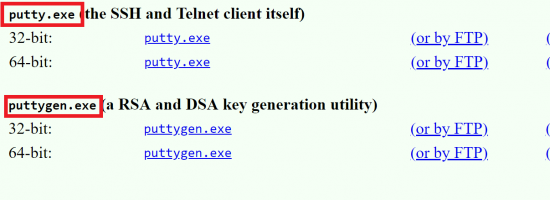
To connect via SSH, we need to change the format of the private key we downloaded to something called “ppk”. To do this, we will use an open-source suite of tools called PuTTy. Specifically, we need two tools:
- exe to convert the private key to .ppk
- exe to connect to the server via SSH
Download both of these files at this location. Here’s a screenshot of the two files you need to download:
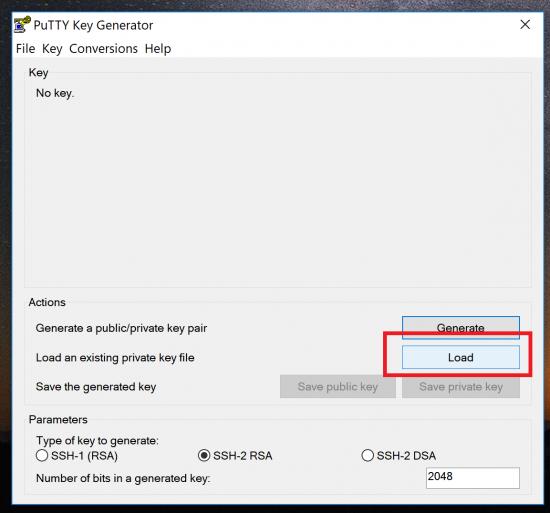
Once downloaded, open “puttygen.exe”. Click “Load” in the dialogue box:
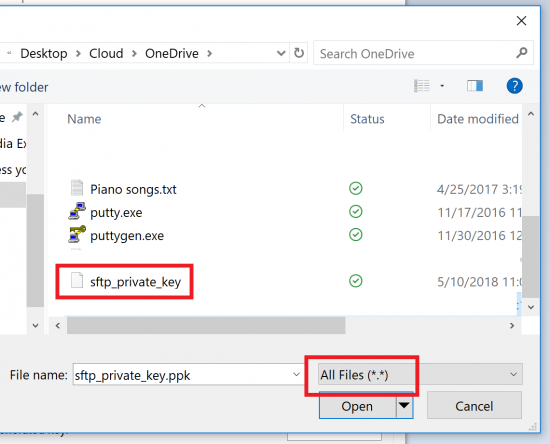
Now choose “All Files (*.*)” from the dropdown box and navigate to the location where you stored your private key file in Step 2:
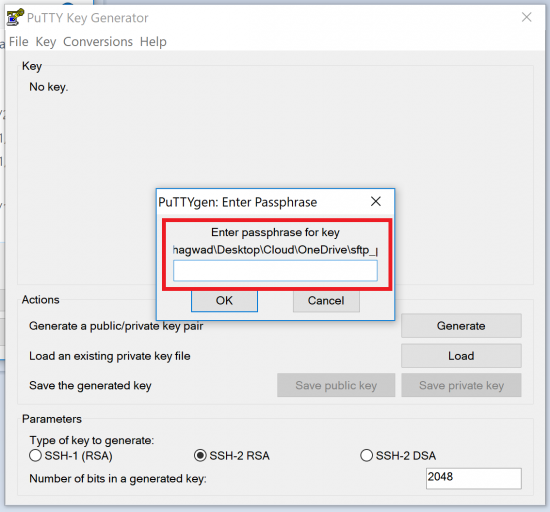
puttygen.exe will ask for the passphrase with which you first created the private key pair in Step 1:
This will open up the private key file. You can now click “Save private key” to save it in a “.ppk” format. Make a note of the location. We’ll need it in the next step.
Step 5: Access cPanel SSH Using PuTTY
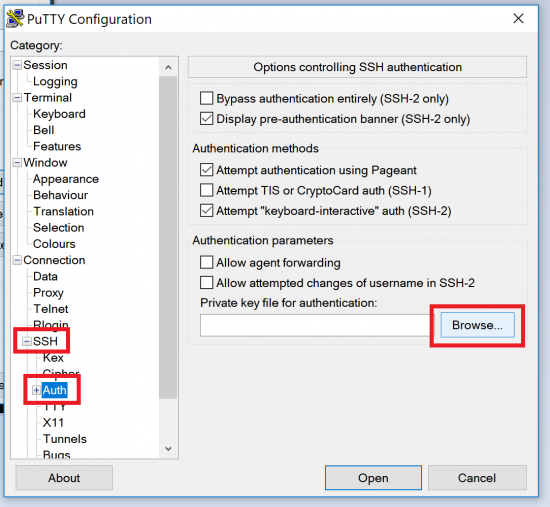
We’re almost there! It’s time to connect to your site via SSH. Open putty.exe, and on the left-hand side with all the options, expand the “SSH” option and click “Auth” as shown here:
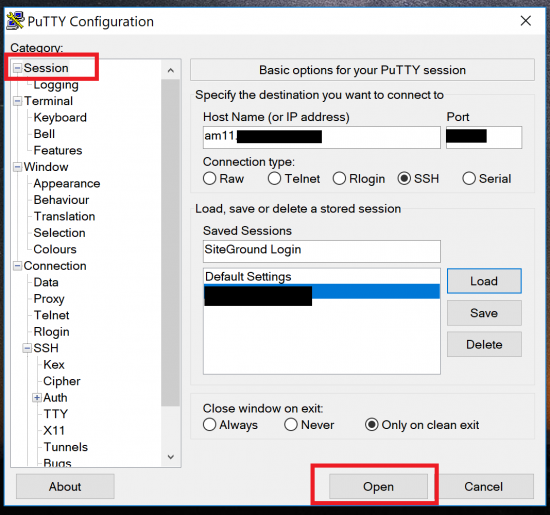
Click “Browse” on the right-hand side and select the .ppk private key file you generated in Step 4. Once selected, navigate to the “Session” section, where you can input your login details. You will need the hostname and port that you got in Step 3:
(Optional) Save your Settings
If you’re going to do this regularly, it’s a good idea to save your settings in PuTTy, so you don’t have to enter all these details and specify the private key file again. Enter a name in the “Saved Sessions” box and click “Save”. I’ve chosen the name “SiteGround Login” in the example above.
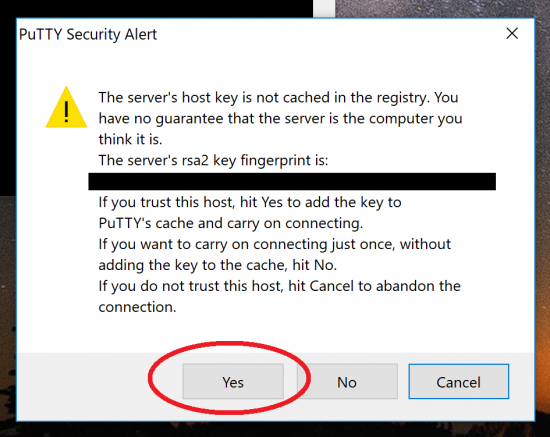
Now click “Open” and PuTTy will connect to your server via SSH using the credentials you entered and the private key file you gave. You should see a message asking you to add the key to the registry cache like this:
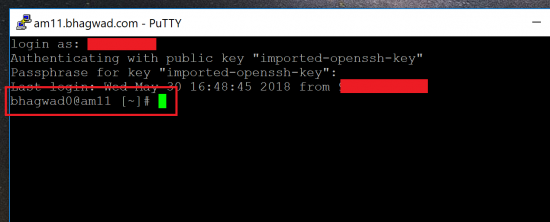
Hit “Yes” and if all your credentials are correct, the SSH window should open as shown here:
Enter your cPanel username, and it’ll ask you for the passphrase for the private key in Step 1. Once you provide all these details, it should connect automatically to the server, and you’re done!
So that’s how you use cPanel to connect to your site via SSH. Much of the procedure is the same as that used with SFTP – indeed, they’re essentially the same. SFTP is just a subsystem of SSH. So if you’ve set up SSH, there’s no reason for you to use regular FTP anymore, which is insecure and dangerous.
I hope you found this helpful!

Speak Your Mind