Here’s how to add a Cloudflare “noindex” tag to your pages using the X-Robots-Tag response header. This solution works for all sites, including those on WordPress.
Table of Contents
1. Determine the URL Pattern to add the Cloudflare Noindex Tag
Presumably, you don’t want to noindex your entire site and instead want to apply it to a subset of URLs. So first, determine the URL pattern for which you want to add the X-Robots-Tag noindex directive using Cloudflare.
For example, I want to add the noindex tag to all my affiliate links that share the following pattern:
https://www.wp-tweaks.com/recommends/
You can also add the X-Robots-Tag response header to individual URLs, but if you’re on the Cloudflare free tier, you only get 10 transform rules and 25 on the Pro plan. So you should be efficient and use a pattern to match many URLs.
2. Create a New Cloudflare Response Header Transform Rule
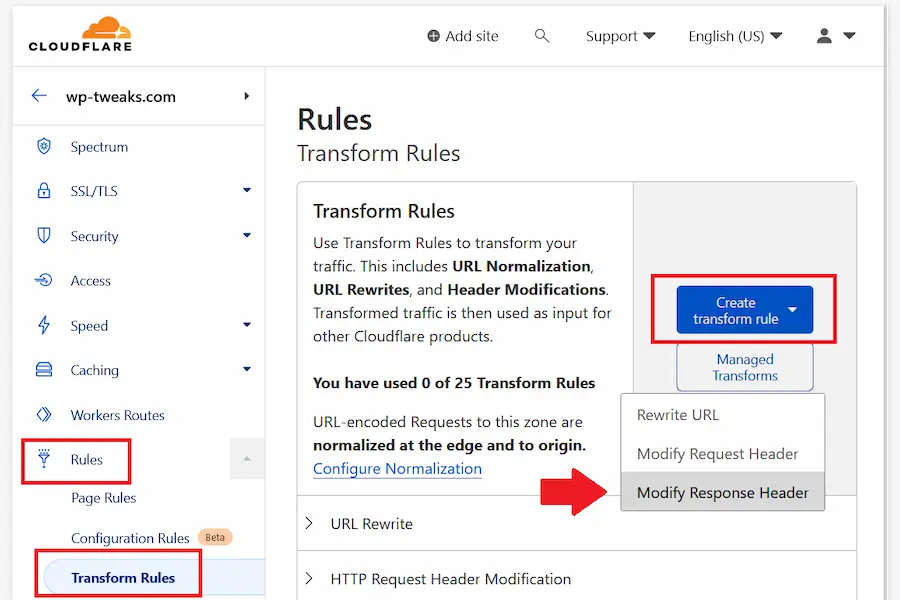
Log into the Cloudflare dashboard and go to “Rules -> Transform Rules”. On the resulting screen, click “Create transform rule” and choose “Modify Response Header” as shown in this screenshot:

This screen will also display the maximum number of rules you can use and how many transform rules you’ve already configured.
3. Add the X-Robots-Tag Noindex Response Header
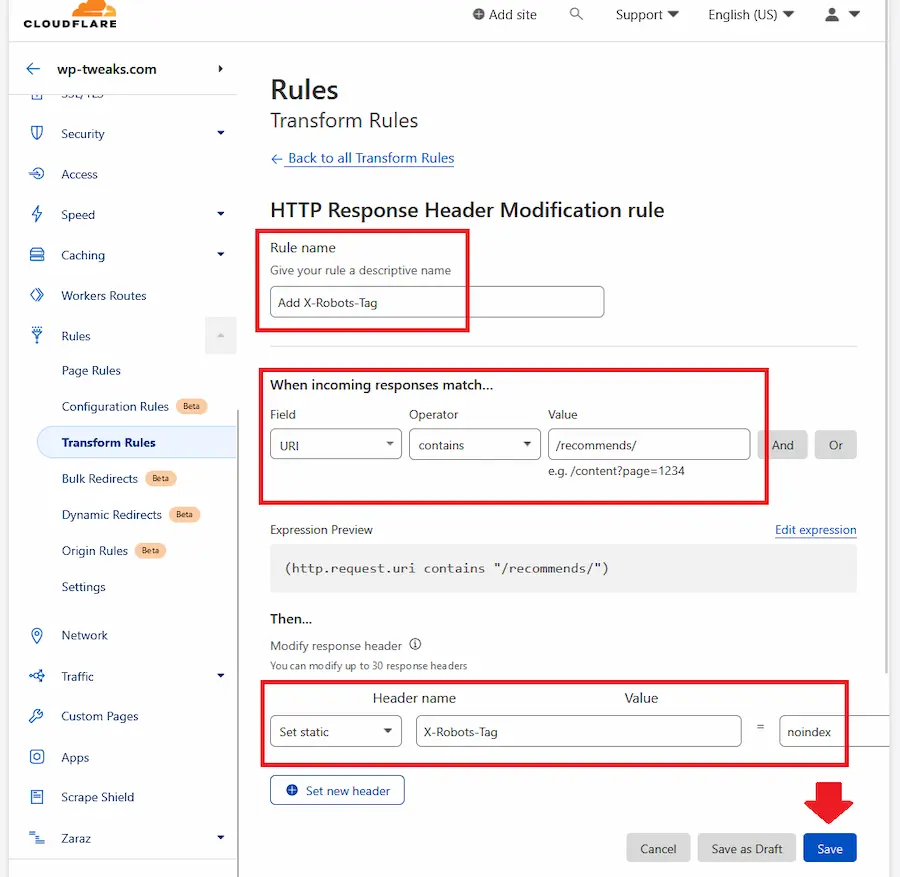
Now we configure the Cloudflare noindex X-Robots-Tag response header like this:

Give your transform rule a name, and under “When incoming responses match”, set the following options:
- Under “Field” choose “URI”
- Under “Operator” choose “contains”
- Under “Value”, set the URL pattern you determined in step 1
You can match more complex URLs using a regex or exclude URLs by setting the “Does not contain” operator. You can filter based on query strings, cookies, and much more. Finally, you can add multiple rules to create complex URL patterns.
In the next section, do the following:
- Choose “Set static” in the first drop-down box
- Under “Header name”, type “X-Robots-Tag”
- Under “Value”, type “noindex”
Save your changes.
4. Verify the Cloudflare noindex X-Robots-Tag
The Cloudflare transform rule activates immediately. You need to ensure that everything’s working and that you haven’t accidentally added the X-Robots-Tag to the wrong pages on your site. This step is essential – if you make a mistake, you could remove all your site’s pages from search!
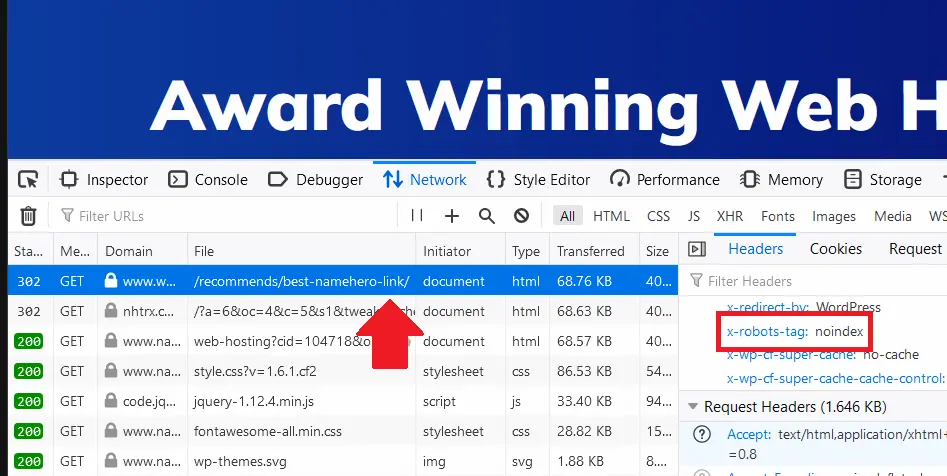
To test that it’s working correctly, open your browser and activate the developer tools. On Chrome and Firefox, press F12 to activate the developer tools window, click “Network”, and load the URLs on your page. After the page loads, click the URL that you want to check and verify the response headers on the panel on the right-hand side like this:

As you can see, Cloudflare has added the “X-Robots-Tag” to my link that contains the “/recommends/” URL pattern. Check some URLs that are NOT supposed to be noindexed to verify that the X-Robots-Tag is missing.
No Need to use Workers for Adding the X-Robots-Tag
I used to recommend using Cloudflare workers to add the noindex X-Robots-Tag response header, but transform rules are much more straightforward. There’s no coding involved, and to be honest, the Cloudflare Worker interface is very convoluted. You only get 100,000 worker requests for free, after which you need to buy more. With Cloudflare transform rules, there’s no limit to the number of URLs it processes. The only downside is the number of rules, which I think is more than enough for even large websites.
Transform Rules for X-Robots-Tag work with Bulk Redirects
A crucial benefit of using transform rules to add the Cloudflare X-Robots-Tag is that it works in conjunction with Bulk Redirects. With these two in place, I can redirect my affiliate links and return the X-Robots-Tag noindex response header simultaneously. Bulk redirects are helpful for database-heavy sites that use WordPress, where I can offload the hits to my server.
Previously with Cloudflare workers, I found that the redirects interfered with the worker code – I could either do one or the other. But with transform rules, I can get the best of both worlds.
The Best Alternative to Robots.txt for the noindex Directive
I didn’t support Google’s move to declare the “noindex” directive invalid in robots.txt. I think that’s a natural place for it, and requiring people to jump through hoops to add a response header is unfair to ordinary website owners who would typically have no idea how to add it. Particularly for CMS sites like WordPress, we don’t want to add new plugins to our site and slow things down even further.
Thankfully, Cloudflare’s transform rules provide a user-friendly way to add the X-Robots-Tag noindex response header.
I hope you found this tutorial useful!

Speak Your Mind